

Electronic Keypad Safe Repair: DIY Fixes & When to Call
Updated: Sep 16
Table of Contents
How to Diagnose Electronic Keypad Safe Problems
Check the LED indicator and beeping sequence
Identify common error codes
Safe Keypad Battery Replacement
Locating and removing the battery
Voltage drop testing and continuity checks
Cleaning and Maintaining Lock Components
Removing debris from the keypad cable and terminals
Inspecting the lock body and solenoid
Resetting Factory Settings and Lockout Mode
Performing a factory reset with override key
Recalibrating the keypad after reset
Troubleshooting Unresponsive Keypads
Testing circuitry and wiring harness connections
Checking for faulty signals and tamper-resistant features
When to Call a Professional Safe Technician
Hardware replacement and firmware issues
Security risks of DIY repair attempts
Common Mistakes to Avoid
Conclusion
Last Updated: August 27, 2026
How to Diagnose Electronic Keypad Safe Problems
When an electronic keypad safe stops responding, most issues follow a predictable pattern and many are fixable without professional help. Electronic safes give you clues through beeps, lights, and error codes that tell you exactly what's wrong if you know how to read them.
Check the LED indicator and beeping sequence
Most digital safes have an LED indicator and beeping pattern that communicate the safe's status. A steady green light typically means normal operation, while a red light or rapid beeping usually indicates a problem. Write down the exact beeping pattern, a single long beep often signals low battery voltage, while rapid beeping usually means an incorrect code entry or faulty keypad signal. If your safe produces no light or sound, the battery is likely completely dead or disconnected.
Identify common error codes
Many electronic safes display error codes on an LCD screen or communicate them through specific beep sequences. A "1-2-3" beep pattern often indicates low battery, while a continuous high-pitched tone usually means the solenoid isn't receiving proper voltage. Check your safe's manual for the specific codes your model uses, the manufacturer's website often has downloadable PDFs with complete error code lists. Immediate errors suggest a hardware or power issue, while errors after repeated tries suggest a lockout mode.
Safe Keypad Battery Replacement
A dead or dying battery is the most common reason an electronic keypad safe becomes unresponsive. Most electronic safes use a 9-volt alkaline battery, though some models use AA or AAA batteries (nfpa.org). When voltage drops below a certain threshold, the safe stops responding to keypad input.
Locating and removing the battery
The battery compartment is usually inside the safe, accessed through the door. Once you have access, look for a small plastic or metal box with two wire terminals. Before removing the battery, take a photo of the wire connections so you can reattach them correctly. Gently disconnect the wires from the battery terminals, some batteries have a snap connector that pops off easily, while others have wires soldered directly to the terminals. Once disconnected, remove the old battery and note its size and voltage rating.

Voltage drop testing and continuity checks
Before installing a new battery, test the old one with a multimeter to confirm it's actually dead. Set the multimeter to DC voltage mode and touch the probes to the battery terminals. A fresh 9-volt battery reads approximately 9 volts; a battery reading below 7 volts is too weak to power the solenoid reliably (peer-reviewed research). After replacing the battery, perform a continuity test on the wiring harness by setting the multimeter to continuity mode and touching one probe to each end of the red wire, if the multimeter beeps, the wire is intact. Repeat with the black wire. Also check the terminal connections for corrosion or loose contacts; if terminals look discolored, gently clean them with a dry cloth or fine sandpaper. Install the new 9-volt battery, reconnecting the wires to the correct terminals, and test the keypad.
Cleaning and Maintaining Lock Components
Dust, debris, and corrosion inside the keypad or lock body can prevent proper electrical contact and mechanical function. The keypad cable is particularly vulnerable to contamination, this flexible ribbon connector links the keypad buttons to the main circuit board, and if dirt or oxidation builds up on the connector pins, the keypad won't register your key presses.
Removing debris from the keypad cable and terminals
Start by powering down the safe and using a dry cloth or compressed air to blow out any visible dust from the keypad buttons. Avoid using liquids, water can damage the circuitry. If the keypad still doesn't respond, you may need to access the keypad cable inside the safe by removing the keypad faceplate, which usually has 2-4 screws. Once the faceplate is off, gently disconnect the flat, flexible keypad cable from the circuit board. Inspect the connector pins for corrosion, which appears as green or white deposits. If you see corrosion, use a soft pencil eraser or fine-grit sandpaper to gently clean the pins. Reconnect the keypad cable, ensuring it seats fully, and reinstall the faceplate screws.
Inspecting the lock body and solenoid
The solenoid is the electromagnetic mechanism that retracts the bolt when the correct code is entered. Visually inspect it for signs of damage, cracks, corrosion, or loose wires. Test the solenoid with a multimeter set to resistance mode, a functioning solenoid typically reads between 50 and 500 ohms. A reading of zero ohms suggests an internal short, while an infinite reading suggests an open circuit. If the solenoid is faulty, it must be replaced by a professional.
Resetting Factory Settings and Lockout Mode
When a safe enters lockout mode after repeated failed code attempts, a factory reset can restore normal operation. Lockout mode is a security feature that disables the keypad for 10-30 minutes after a set number of incorrect entries to prevent brute-force attacks (nist.gov).
Performing a factory reset with override key
The override key is a physical key that bypasses the electronic lock and is usually supplied with the safe. Insert the override key into the mechanical keyhole, usually located near the electronic keypad, and turn it to the specified position, your manual will show whether it's a quarter turn, half turn, or full rotation. Once the mechanical lock is open, the electronic system resets. The LED light may flash a specific color sequence to indicate a successful reset. After the reset, the safe typically returns to factory default settings and any user codes you programmed are erased.
Recalibrating the keypad after reset
After a factory reset, enter the factory default master code (usually "0000" or "1234") to access the settings menu. During calibration, press each keypad button several times in sequence so the safe's circuitry learns the electrical signature of each button press. Some safes auto-calibrate after a reset, requiring no manual intervention.
Troubleshooting Unresponsive Keypads
When the keypad doesn't register any input, the problem lies in the keypad circuitry or wiring. Start with the multimeter set to continuity mode and test each wire in the keypad cable, a beep indicates a complete circuit, while no beep means a broken wire. If the wiring harness is intact, the problem is likely the keypad itself or the circuit board. Next, perform a voltage test on the keypad terminals with the safe powered on, you should read approximately 9 volts. A reading of zero suggests a problem with the power distribution circuit on the main board.
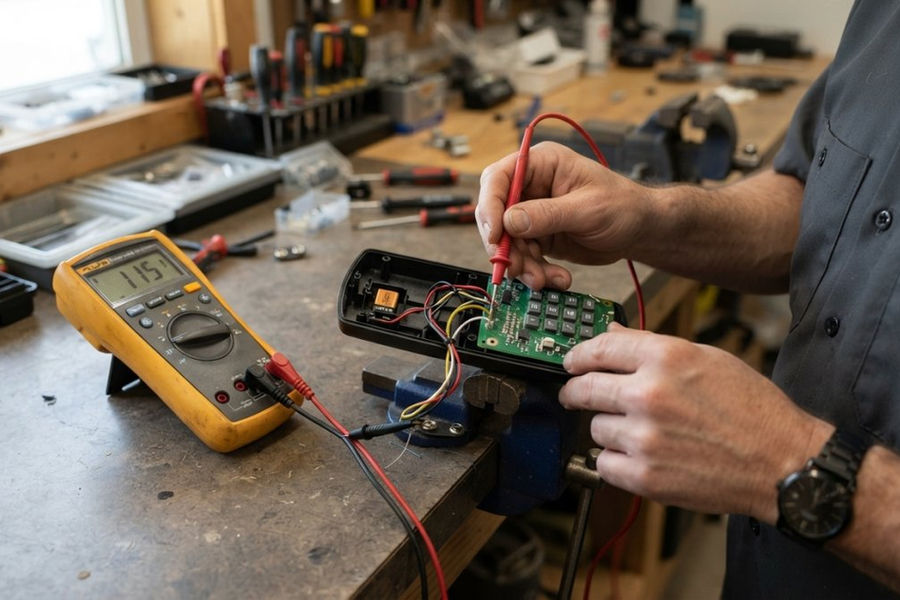
Checking for faulty signals and tamper-resistant features
Some electronic safes have tamper-resistant features that disable the keypad if the safe is opened or if certain internal switches are triggered. Check whether the safe's door sensor is working by opening and closing the safe door fully and listening for a click. Some safes also have an internal tilt or motion sensor that triggers a lockout if the safe is moved, if your safe was recently relocated, this sensor might be in a triggered state.
When to Call a Professional Safe Technician
Some problems require professional expertise and specialized tools. Knowing when to stop troubleshooting and call a locksmith saves time and prevents further damage.
Hardware replacement and firmware issues
If your multimeter tests confirm a faulty solenoid, broken keypad, or damaged circuit board, replacement is necessary. These components are not typically available to consumers and require specialized knowledge to install correctly. Firmware corruption due to power surges, water damage, or manufacturing defects is another professional-only issue. Water damage is particularly serious, if your safe has been exposed to moisture, the circuit board may be partially corroded and the solenoid may be stuck.
Security risks of DIY repair attempts
Opening an electronic safe to access internal components creates security vulnerabilities. If you leave the safe unattended during repair, someone could tamper with the locking mechanism. Disassembling the keypad or circuit board can also expose you to hazards, some safes contain capacitors that hold electrical charge even when the battery is disconnected. Additionally, opening your safe yourself voids the warranty.
At Bay Safe and Lock, our licensed technicians have the specialized tools and training to diagnose and repair electronic safe problems safely. We handle everything from solenoid replacement to firmware updates, ensuring your safe functions securely and reliably. If you've exhausted DIY troubleshooting and your safe still isn't responding, we're here to help.
Common Mistakes to Avoid
Assuming the battery is dead without testing it. A battery that reads 8.5 volts on a multimeter might still work fine. Mixing up polarity when reconnecting battery wires. Red is positive, black is negative, reversing these can damage the circuit board. Using water or liquid cleaners on electronic components. Water causes corrosion and short circuits. Forcing the keypad buttons or override key. These are precision components that can break if forced. Ignoring error codes or beeping patterns. These signals tell you exactly what's wrong. Attempting solenoid or circuit board replacement without training. Improper installation can permanently damage the safe. Leaving the safe open and unattended during repairs. This creates a security risk.
Conclusion
Electronic keypad safe problems are frustrating, but most are diagnosable and fixable with basic tools and patience. Start with the simplest solutions: check the battery, clean the connections, and listen to the error codes. If you've worked through these steps and your safe still isn't responding, or if you've identified a hardware failure that requires replacement, that's when professional help becomes essential.
Bay Safe and Lock specializes in electronic safe repair and can handle everything from battery replacement to complete solenoid and circuit board replacement. Our licensed technicians use diagnostic equipment that identifies problems quickly, and we stand behind our work. NEED AN ESTIMATE FOR YOUR PROJECT? CLICK HERE to schedule a consultation with one of our experts.
Frequently Asked Questions
Q: What should I do if my electronic safe won't open?
A: Start with the basics: check the battery, ensure the keypad is clean and responsive, and verify you're entering the correct combination. If the LED indicator is off or the keypad shows no response, replace the 9-volt alkaline battery first. If the safe still won't open after battery replacement and a factory reset, contact a professional safe technician. Attempting to force the lock body or solenoid can damage internal mechanisms and compromise security.
Q: Does a digital safe lose its code when the battery dies?
A: No. Most electronic keypad safes retain the combination code in their firmware even when the battery is completely dead. However, the safe cannot unlock without power. Once you install a fresh 9-volt alkaline battery, the lock should respond to your combination. If the keypad remains unresponsive after battery replacement, the issue may be a faulty solenoid, wiring harness damage, or circuitry failure requiring professional repair.
Q: Why is my safe keypad not responding to my input?
A: A non-responsive keypad usually points to a dead or weak battery, dirty terminal connections, or a damaged keypad cable. Start by replacing the battery and cleaning debris from the terminals and lock body. Test continuity with a multimeter if you have one. If the LED indicator shows no light and the beeping sequence is absent, the power supply is the issue. If the LED lights but keys don't register, the keypad cable or internal circuitry may be faulty, and professional digital safe lock troubleshooting is recommended.
Q: Can a digital safe be repaired or does it need full replacement?
A: Most electronic keypad safes can be repaired. Common fixes include battery replacement, cleaning corroded terminals, and resetting factory settings. More complex issues like a faulty solenoid, damaged wiring harness, or firmware problems may require component replacement rather than full safe replacement. A professional safe technician can diagnose whether repair is cost-effective. UL-rated safes are built for durability, and replacing individual hardware like the lock body or mounting hardware is often more economical than buying a new safe.
NEED AN ESTIMATE FOR YOUR PROJECT? CLICK HERE
This article was written using GrandRanker


Comments